How to take high quality photos and videos with LED props? 01/12/2023
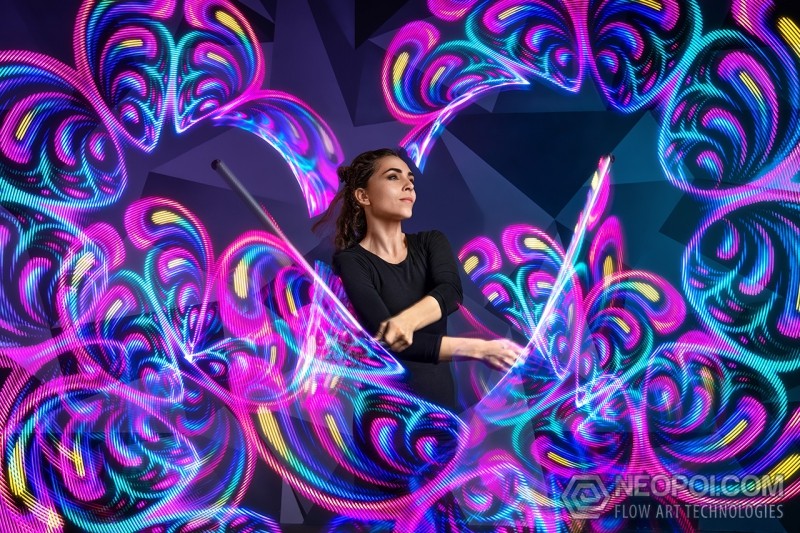
Often there is the question - “How did you achieve such beautiful light trails on your photos and videos?" If you have never taken photos and videos with light props, this may not be as simple as it appears. Most often, the whole difficulty lies in the fact that the artist is in the dark, and the props are too bright.
In this article we will try to give our recommendations and talk about how we take photos and video.
PHONES

Here we will not consider shooting on the phone. To achieve a good result on the phone is almost impossible. Regarding video, most often, it all comes down to the “latest iPhone” and favorable external conditions, when external lighting, background and props in sufficient brightness allow the phone to convey what is happening. However, we always recommend that you at least use the “power saving mode” (lower brightness) that is found on all of our programmable props when shooting with your phone. On good phone models, you will have a much better chance of rendering the color palette of the light trace in the dark if the power saving mode is turned on. Phones in 99% of cases, when shooting in the dark, turn your overly bright light trace into white.
- 1) If you are planning to shoot in complete darkness, then use the power saving mode (low brightness) in the props to get rich and saturated light trails without overexposure. This mainly applies to props with a large number of LEDs, where the LEDs are closely set and there are a lot of them (For example, poi and staffs 48, 64, 80, 150, 180 ....)
- 2) Use simple pictures for photos where there are more black voids in the picture, and not a solid fill. For video, if you use constantly changing pictures, use a selection of pictures that is approximately the same in complexity and brightness.
Recommendations for preparing props before PHOTO and VIDEO shooting:
PHOTO ON SLR CAMERA
In fact, if you have the right equipment and know how to use the settings, everything is not so difficult.
The main problems in the photo are that the color of the light traces from the props falls into white, the colors are not saturated, or the artist is not visible at all.To get a good result, first of all you need a SLR camera and a tripod. The camera must have a fully manual mode (“M” mode).
So, with your camera mounted on a tripod, set the mode to "M" and try to start your experiments with the following settings:
- ISO 100-400 (according to the situation for sufficient exposure)
- Aperture 4-5.6 (according to the situation for sufficient exposure)
- Shutter speed from 1/4 to 2 seconds, depending on what spinning elements the artist uses and how long the trace you want to get in the result.
Ask the artist to start spinning something simple and start taking pictures. If suddenly the photo turned out to be too dark or bright, adjust the aperture and ISO. If the light trails are visually too "long" or "short", change the shutter speed respectively. On our shoots, we adjust the shutter speed manually. (We use remote control with “bulb” mode, where the first push is the opening of the shutter, the 2nd is closing)
You may find that the light from the props creates "ghosts" in the photo. If you want the artist’s image in the photo to be sharp, use at least 1 flash. You need to enable 2nd curtain sync on your camera and flash at the end of your exposure so that the final pose of the artist is sharp in the picture. In other words, when the shutter is opened, the light trail is exposed, and when it is closed, the flash fires and we fix the artist in the photo.
VIDEO ON CAMERA

Consider the most honest option for obtaining a high-quality light trail, as in most of our videos. Here we do not consider video editing. There are all sorts of tricks that you can try when editing later, but as a rule we do not use them.
The length of the light trail strongly depends not only on the camera settings, but also on the speed with which the artist spins the props. In our videos, we try to show the effect that is visible to the eyes. It does not always has 100% success (depending on the type of props), but in general, we always strive for such an effect.
It should be noted that cameras in automatic video recording modes almost always have incorrect settings by default. But if you have a fully manual camera, things are much easier.So, your camera is ready to shoot and switched to full manual mode. What's next? Make sure the frame rate (fps) matches the shutter speed. It is very important! Thus, the video will not have black "gaps" in the light trail and it will look smooth.
Example settings (Nikon Camera):
- Framerate 30
- Shutter speed 1\30
- Shooting mode M
- Contrast -3 (most minimal)
- Aperture - according to the situation
- White balance - according to the situation, adjust manually
*30 fps strikes a good balance between pretty long light trails and smooth motion. You can also try 25fps and a shutter speed of 1/25th of a second which leads to a good result either.
The aperture and ISO must be set so that the exposure (brightness of the video) is not too dark or too bright. Be sure to turn off any AUTO settings because the camera always "assumes" that the footage is too dark and increases the brightness. When adjusting aperture, ISO, and white balance, make sure the colors are not too pale.
Have a nice photo shooting and inspiration! If the article helped you, we will be glad to see your results, send your works and links to your social networks to us by email: info@neopoi.com